210 Gallon In Wall Build

Reef Aquarium & Tank Building Forum

Help Support Reef Aquarium & Tank Building Forum:

Jerrow

Active member
Joined
Aug 20, 2005
Messages
39
Location
Spokane
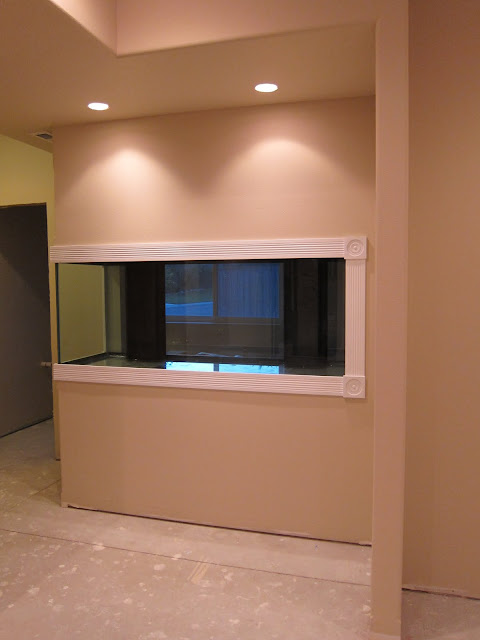
In November of 2007 we closed on our new house that we intentionally let the downstairs unfinished in preparation for a new in wall fish tank. The first time I walked through the downstairs I could already envision where the tank would go. Right were the large propane tank is in the picture below. This would allow a 6ft tank, viewable on two sides (end and front) and a room behind the tank for all the "crap".
IMG_0229.JPG


In December of 2007 we purchased a 210g AGA RR from Kevin at Aquatic Dreams with a warning from my wife to "take it slow".
IMG_0378.JPG


And it sat in the garage on saw horses for 3+ years while I "took it slow" (my wife insists this is not what she meant). During this 3+ years I managed to spend a few hours here and there downstairs to do all of the framing, electrical, plumbing, etc for the entire downstairs (not just for the fish tank).
IMG_0424.JPG


IMG_0478.JPG


Fast forward to a month ago and we have mermaids!
IMG_0293.JPG

IMG_0301.JPG

IMG_0303.JPG
 
Over the weekend I put the counter and sink into the fish room and put the trim around the tank.
IMG_0308.JPG


IMG_0310.JPG


IMG_0307.JPG


IMG_0399.JPG


IMG_0400.JPG


IMG_0401.JPG


IMG_0402.JPG


IMG_0403.JPG


For those that like the details, there are a total of 3 GFI dedicated circuits in the fish room (2 15A and 1 20A) with the outlets spread throughout the room. If I had to do it over again, I would have planned a bit more of what equipment would be going where to place the outlets in a little better locations. As it stands now it won't be bad, but could be improved. Will still be a few months before water goes in the tank, but things are starting to come together.

And yes there will be additional bracing under the tank and counter...
 
Last edited:
Carpet (not in the fish room) will be installed on Monday and the doors/trim should be delivered toward the end of the week... No end of things to do on the weekends!
 
Looks nice once again! I saw this tank on your other thread. Looking forward to seeing it all finish coming together. :)
 
Thanks Krish, basically just moving the thread over here instead of hijacking Kevin's thread.
 
Wow! Nice work Michael, going to be a sweet setup I'm sure. Looking forward to seeing it progress.

Cheers, Todd
 
The one element that I have been struggling with the most is the sump. I'm conflicted on how I want to configure the plumbing. Should I go all out and get an acrylic sump with refugium, skimmer section, filter socks, etc or just use water storage containers to increase my water volume and handle the refugium and skimming via an external 40g breeder tank plumbed into the system?

I am leaning toward just biting the bullet and going with a fabricated acrylic sump... Any thoughts from the peanut gallery? I've seen all different installs from members that range from water storage tanks to Rubbermaid water troughs to the nice acrylic sumps and can see some pros/cons for each...
 
I would go all out and do it the way you want to the first time. It will be a pain to redo it and you wont want to have to redo it and you will be kicking yourself for not doing it in the first place.
So I say do it and do it big!
 
If you can do a remodel like you have shown, there is no reason why you cant build a sump out of acrylic to your liking. IMO Go the extra mile, you will thank yourself a year from now.

Nice work!!!
 
x2 IPisces

Great work overall, can't wait to see it up and running. One thing I would do is paint the back, unless you want people to focus on seeing through to the fish room.
 
x2 IPisces

Great work overall, can't wait to see it up and running. One thing I would do is paint the back, unless you want people to focus on seeing through to the fish room.

Thanks for the feedback! Actually been thinking about that. I painted the back of my last tank and while I loved the look, I missed not being able to see for maintenance. Since my only access to this tank will be from the back, I am toying with some type of black acrylic removable panels. Not sure the logistics of it yet, but I want to be able to see into the tank from the fish room when I need to work on the tank.

On a side note: carpet looks great! After walking on concrete for the last three years it sure feels weird to have carpet down stairs. The girls ran around downstairs for a good hour doing nothing other than roll around on the carpet and chase each other. And with a color name like "Sugar Sand" what's not to love about it, right?

IMG_0407.JPG


IMG_0409.JPG
 
Last edited:
Possible ideas for the back of the tank. A simple window blind. Iam sure they come in many colors, if not paint it. Another is a by-pass door, it could have 3 or 4 panels. Painted to your liking. I dont know the layout of your plumbing back there, but either could possibly work.
 
Peppie - pictures below might help you visualize the layout a little better. What I am thinking of doing is cutting a piece of black acrylic to fit the back of the tank and use "velcro" or something similar to hold it in place.

First a picture of the area behind the tank
IMG_0405.JPG


And a layout drawing showing the layout of the fish room
Layout.JPG
 
Last edited:
Sweet.
Acrylic is more spendy than a sheet of 1/4'' hard board. You can paint the hardboard, dark at the bottom and lighter as you go up tho the top. If you made a dado in a piece of wood for it to sit in at the bottom and then the Velcro at the top. You could have three or four different color back grounds for the price of one color of acrylic.
You are very lucky to have an open pallet to work with. Take your time and do it how you want it. There is not much worse than " Wish-I-Would-of-could-of "
 
Is that water in the tank?

Let's see if we can bring this thread back to life! No there isn't water in the tank yet, but we are getting closer... When last we left this thread I was expecting a shipment of doors and trim (wow was it really 17 months ago?). The doors are in, the trim is down, crown molding is up, etc. Lights and dry rock are on their way according to UPS. Can almost put water in this beast, except for the sump and of course plumbing. Before I put the sump into production, anyone see any glaring issues with the design below? Will be constructed out of 3/8" acrylic. Roughly 60 gallons when operational, can hold up to 80 gallons if necessary. Not going to push much more than 1,000 - 1,200 GPH through it as the AG overflows are only rated up to 600 GPH each.

Nothing overly fancy other than the filter sock rack (don't like the hang on holders nor do I like the drain lines going right into the socks; too hard to get them out to clean them) and the removable cover over the intake side to help cut down on any splashing.

<img src="https://lh6.googleusercontent.com/-PGIjvY0kHjw/UNK0vKoD7uI/AAAAAAAAIIw/XA5RMYCDL_o/s640/Sump%25203D_1.jpg" width="768" />

Here is the empty FTS with now that all of the construction is done.
<img src="https://lh6.googleusercontent.com/-ZKf3CP2vugA/T2lggda_OOI/AAAAAAAAHYg/kUyJLlSY7yE/s640/IMG_1278.JPG" width="768" />

Picked up a couple 35 gallon Ace Roto water storage tanks last week as well. Going to use this as RO and SW holding tanks with auto top off, automated water changes (incremental instead of weekly). Haven't worked through all of the design work yet, but basing the concept off of what Tom White did over at Glass Reef - Home

<img src=http://www.sprayerdepot.com/mmSPRAYERDEPOT/Images/FS00035SWSL_original.jpg width="480" />


I'll post more pictures once I get the rock arranged in a presentable layout.

Happy Holidays Boys & Girls!!!
 
Looks really clen to me. Your fab skills are way beyond mine as well as your carpentry skills. I notice your sump design doesnt have a fuge. Are tou planning on having one or is it going to be seperate?
 
Back
Top